
Last Updated on April 8, 2024 by Umer Malik
If you want to understand the procedure of using alternative vendors in QuickBooks enterprise, then this illustrative piece of writing will definitely prove helpful for you. It can be challenging to keep track of details like pricing or lead times if a user is simultaneously working with several vendors. These can also change depending on the vendors you employ. It is simple to match vendor products with inventories by making use of alternative vendors. Users can quickly compare options when it’s time to buy and decide which vendor to work with right now.
For additional support or in case of any doubts regarding the process, you can call our technical professionals. Furthermore, if you face difficulties while performing the steps, there is no need to worry, as our experts will perform the procedure on your behalf.
Procedure for viewing vendor items
All inventory and non-inventory purchases made from vendors in the previous 12 months are listed in detail on the vendor item list. This comprises the cost, the date, and the quantity of the purchase. The easy procedure to view vendor items is given below:
- To start off, hit on the Vendors option.
- Now, head for the Vendor Center.
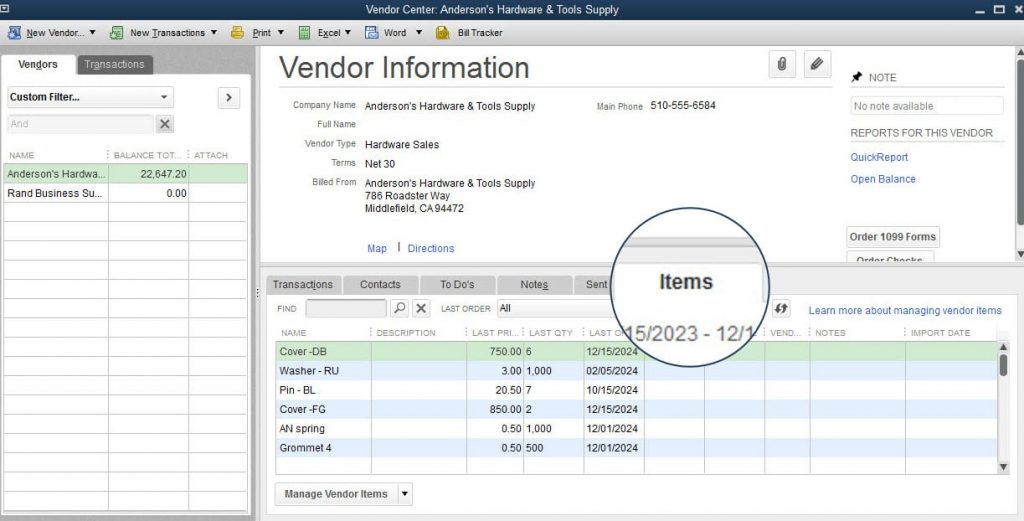
- After choosing the merchant, choose the Items tab.
Steps to upload price list of alternative vendor
The user can import a vendor price list when dealing with them for the first time. The item prices, lead times, unit of measurement and part numbers may all be included in the price list. To make things easier, you can perform the following steps:
- Initially, pick the vendors option.
- Then, proceed to the Vendor Center.
- Now, hit on the Items tab.
- Finally, opt for Import from Excel after choosing Excel.
Assigning alternate vendors for inventory
Up to four different vendors can be incorporated into an inventory item. This makes it simple to identify the preferred vendors for certain items when creating a purchase order. Perform the steps given to assigning alternate vendors for inventory.
- The user needs to initially choose Lists.
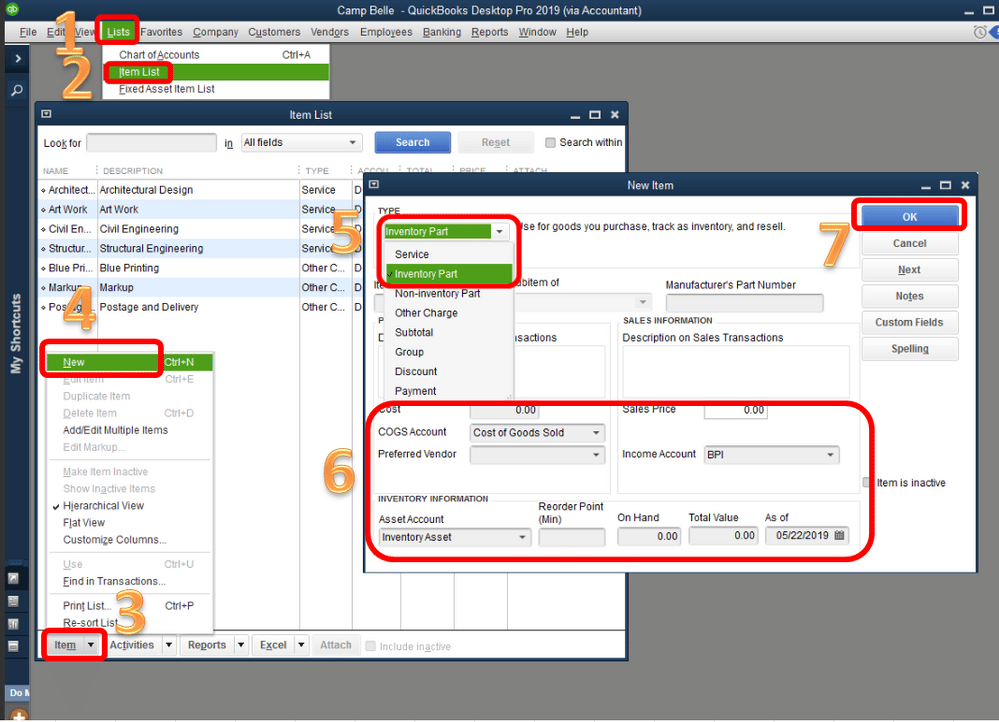
- The, opt for the list of selectable Items
- Lastly, hit on the Edit item after choosing a stock item.
- Then, integrate vendors in the inventory goods after choosing Manage Vendors.
Comparison of vendors
The user can make a comparison of alternative vendors while going to buy merchandise. The steps for the same are given as under:
- The user is initially required to add at least two products to the purchase order.
- After choosing a stock item, the user needs to click on the Compare vendor icon. This will display all of the merchants bought during the previous 12 months, along with their pricing lists.
- After choosing a vendor, the next step is to click on View Vendor Price.
- The user then needs to choose whether to examine the amount of the most recent purchase order or the vendor price you imported.
- If a different vendor is chosen and the user seeks to check the total purchase order amount, then again choose a vendor, followed by heading to view vendor price option.
You may also read : An Easy Guide to Install Belkin Extender via Manual Method
The process of using alternative vendors in QuickBooks Enterprise is quite an easy task if the user follows the descriptive details encapsulated in this article. We have attempted to make this article as simple as possible for easy understanding for readers. Meanwhile, if you require our support for any QuickBooks-related problem or complexity, then you can directly call our QuickBooks experts at the helpline 1 800 761 1787 or visit us through the Live chat option, wherein our Technical expert is always available to guide you through your queries.
Apart from this if you are interested to know about Install Belkin Extender then visit our Tech category.


: Dave Portnoy Net Worth, Family, Career and Everything You Need To Know")


: Dave Portnoy Net Worth, Family, Career and Everything You Need To Know")


